
Textures
The Textures tab works with the pictures on a material: a label, a wood grain, a brushed metal pattern, the small bumps of a plastic. It sets how the pictures lie on the product, and shows the maps of the selected material so you can replace them.
Select a part of the model first (a plain click). The tab then lists the maps of its material.
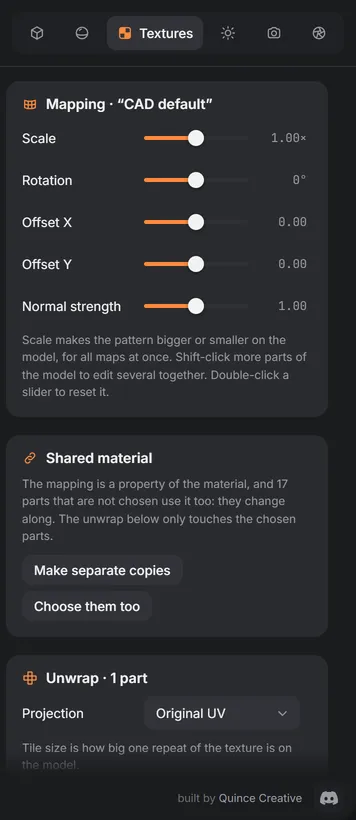
Mapping
Mapping moves the pattern on the model, for all the maps of the material at once:
- Scale makes the pattern bigger or smaller.
- Rotation turns it.
- Offset X and Offset Y slide it.
- Normal strength makes the bumps of the normal map deeper or flatter.
The mapping belongs to the material. If parts you did not choose use the same material, the tab says so and offers Make separate copies, so that only the chosen parts change, or Choose them too to include them.
Shift-click more parts to edit several together. A slider without a handle means the chosen parts differ; move it to give them all the same value. Double-click a slider to reset it.
Unwrap
A texture needs a way to lie on the surface (its UV coordinates). Many CAD models have none, or bad ones, and a texture then looks smeared or stretched. Unwrap gives the chosen parts new coordinates from their shape:
| Projection | Best for |
|---|---|
| Original UV | The coordinates from the file (when they are good) |
| Box | Most shapes: the pattern is projected from six sides |
| Planar | Flat parts, a lid, a front panel: projected from one direction (Looks along X, Y or Z) |
| Cylindrical | Bottles, cans, handles: wrapped around an Axis |
| Spherical | Round shapes |
Tile size is how big one repeat of the texture is on the model, in centimetres, so a wood grain or a fabric has the same scale on every part.
Texture maps
Each map has a slot. Click Replace… or drop a picture onto a slot; Remove takes it off and Reset brings back the one from the file. Click a thumbnail to see the map full size.
| Slot | What the picture sets |
|---|---|
| Base color | The colors of the surface: labels, prints, wood, fabric |
| Normal | Small bumps and grooves that catch the light, without changing the shape |
| Roughness | Where the surface is glossy and where it is matte (dark is glossy, light is matte) |
| Metalness | Where the surface is metal |
| Ambient occlusion | Darkening in creases and corners |
| Emissive | Where the surface glows, and in which color |
| Opacity | Where the surface is see-through (cut-outs, decals) |
| Clearcoat | Where the clear lacquer layer is |
| Transmission | Where light passes through |
Base color and Emissive are read as color pictures, the others as data. Roughness is read from the green channel and metalness from the blue one, so a plain grey picture works for both. A GLB that packs occlusion, roughness and metalness into one picture shares it between those slots until you replace one.
Logos (decals)
A logo is a picture stuck on the product: a brand mark, a label, a warning symbol. It follows the curve of the surface, works on any model (no unwrap needed) and stays a separate layer, so you can move, recolor or remove it without touching the material.
Adding a logo
- Open the Decals tab in the bar at the bottom and click Add image. Use a PNG or SVG with a transparent background; a JPG works too, but it has no transparency and is placed as a rectangle.
- Drag the picture from the bar onto the model, or click it and then click the model.
The list of logos is at the bottom of the Textures tab. Click a logo to choose it, click the eye to hide it, and drag it to change the order: the first logo is in front when logos overlap.
Settings of the chosen logo
| Setting | What it does |
|---|---|
| Size | The width of the logo, in centimetres. The height follows the picture |
| Rotation | Turns the logo around its centre |
| Offset X / Y | Slides the logo from where you clicked |
| Wrap angle | How far the logo may follow a surface that turns away. Lower keeps it on the flat part, higher wraps it around a curve |
| Roughness | How glossy the logo is. Match it to a printed or a metal-foil look |
| Fill color | Paints the whole logo one color; the transparent parts stay transparent. Turn it off to bring back the colors of the file |
| Colors in this logo | SVG logos only: every color of the file is listed with its own picker, so you can change one without touching the others. Reset colors brings back the originals |
| Lift off surface | Off: the logo lies flat on the surface and casts no shadow. On: it sits a little above it, like a sticker with a thickness (Lift, in millimetres), and then casts a shadow |
Place again moves the logo to another spot, Replace shows another picture in the same place, and Remove deletes it.
Logos are kept with the project, in a .qproj file and in a cloud project, together with their pictures. They are not part of a state.