
Model
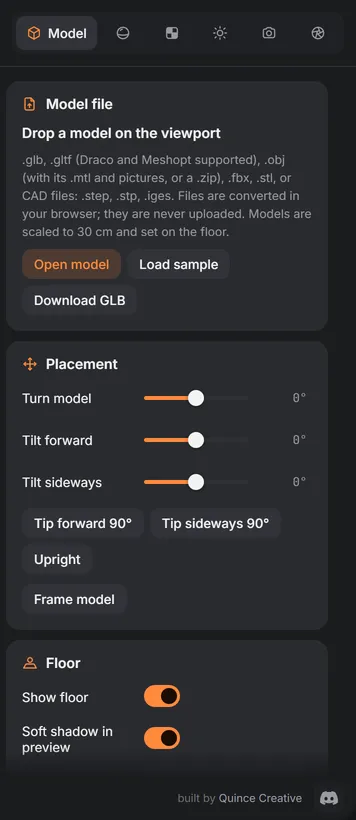
The Model tab loads your product, places it on the floor and sets up the floor itself.
Opening a model
Drag a file onto the viewport, or press Open model. The lab reads:
| Kind | Files |
|---|---|
| glTF | .glb, .gltf (with Draco and Meshopt compression) |
| OBJ | .obj together with its .mtl file and pictures, or all of them in one .zip |
| Other meshes | .fbx, .stl |
| CAD | .step, .stp, .iges |
Files are converted in your browser and never uploaded. CAD files are turned into a mesh on your computer; a large assembly can take a while. While a model, a CAD file, an HDRI or a project loads, the viewport shows what is happening: for a CAD file three steps (Read file, Make triangles, Place on floor) with the time that has passed, for other files a bar with the percent. Cancel stops it and keeps the previous scene as it was. If the file cannot be read, the viewport says why; Keep current model goes back to the scene you had, Open another file lets you choose a different file. While something loads, Render, Save PNG and the quality controls in the top bar wait; the side panels stay usable.
Every model is scaled to 30 cm across and set on the floor in the middle, like a product on a tabletop. This keeps depth of field and lighting believable whatever units the file was made in. Download GLB gives the model back at its original size.
Load sample puts the built-in perfume bottle on the floor, to try materials and light without a file of your own.
Under the buttons, the tab shows the file name and how many meshes, triangles and materials the model has.
Tip: for CAD files from SolidWorks, Fusion, Creo or similar, export STEP (
.step/.stp). It keeps the parts apart, so you can give each one its own material.
Placement
- Turn model turns the product around its vertical axis. It is the quickest way to show another side without moving the camera and the light.
- Tilt forward and Tilt sideways lean it. A model that arrives lying on its side (CAD files are often drawn seen from above) is stood up with Tip forward 90° or Tip sideways 90°. Upright goes back to the way the file had it.
- After a turn or a tilt the model is centered again and put back on the floor.
- Frame model moves the camera so the whole product fills the frame.
The turn and the tilt are kept in states, in project files, and in the GLB you download.
Floor
- Show floor switches the floor on and off.
- Shape: Studio sweep is a floor that curves up into a back wall without a visible edge, like the paper roll of a photo studio. Flat plane is a plain floor.
- Color and Roughness set its look: a low roughness makes a glossy floor with a reflection of the product, a high roughness a matte one.
- Metalness, Specular, Clearcoat, Coat roughness, Sheen, Transmission, IOR and Glow work like the same settings of a material (see Materials): a metallic floor, a lacquered one with a clearcoat, a floor that glows. They are saved with states, under Background & floor, and are part of Download GLB when the floor is included.
- Match background color gives the floor the color of the background, so the two blend into one.
- Soft shadow in preview draws a soft shadow under the product in the fast preview (while rendering is off or the camera moves). The render itself always has its real shadow.
Animated models
If the file carries an animation, an animation player appears in the bar under the viewport, between the library tabs and the icon sizes: play and pause (Space), a loop button, a scrubber to pick a frame (click or drag it, or use the arrow keys: one frame, with Shift ten), the frame and time, and the clip when the file has several. The bookmark button Save this frame as a state keeps the chosen frame together with the rest of the look as a new state. The render uses the frame that is on screen.
Download GLB
Download GLB saves the model with your material edits as a .glb file at its original size, turned and tilted as in the lab. Before the download you can add:
- Floor: the studio sweep (or the flat floor) as a mesh with its material, under the model.
- Lights: the softboxes of the studio rig as directional lights, aimed at the model (an approximation of the rig). With an HDRI there are no lights to write: an HDRI lights through the environment.
- Environment map: a GLB cannot carry one, so it is saved as an
.hdrfile next to the GLB. Your browser may ask to allow two downloads.