
Camera
The Camera tab works like the lens and the viewfinder of a real camera: the focal length, the depth of field and the shape of the picture.
Moving the camera
In the viewport:
- Drag with the left mouse button to turn around the product.
- Turn the mouse wheel to come closer or go back.
- Drag with the right mouse button to move the view sideways.
- Frame model (here and in the Model tab) brings the whole product back into the frame.
- The view cube appears in the top right corner of the viewport when the pointer is over it, and turns with the camera. Point at a side, an edge or a corner to light it up; the name of the view shows below the cube. Click a side (Front, Right, Top, Back, Left, Bottom) for that view, an edge for the 45° view between two sides, a corner for a three-quarter view. The camera swings there in less than half a second, keeping its distance and the point it turns around. Drag the cube to turn around the product, as in the viewport. Three buttons show next to it: turn the view 90° left or right, and Home (key H), which does the same as Frame model. The floor limits how low the camera can go, so Bottom ends at the lowest angle. The cube is never in the saved picture. You can use it while a render is running; a new angle starts the render again.
Every camera move starts the render again. While you move, the viewport shows a fast preview; the render continues when the camera is still.
Lens
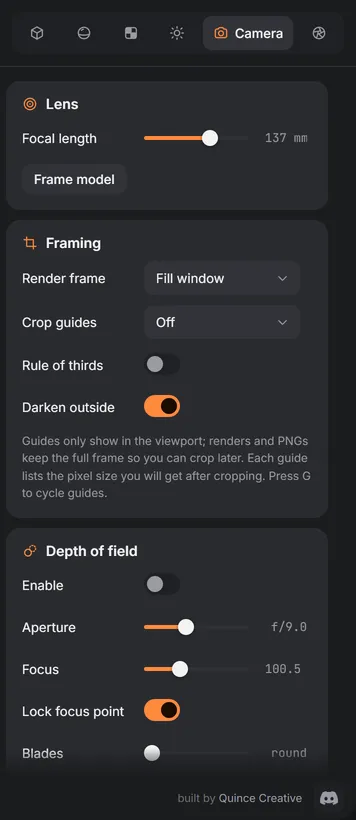
Focal length works like the lens of a camera, from 18 mm (wide) to 200 mm (long). Product photographers mostly use 50 to 135 mm: the longer the lens, the flatter the perspective and the less distorted the product looks. A wide lens close to the product exaggerates its shape.
Depth of field
Depth of field keeps one plane of the product sharp and blurs what is in front and behind, as with a real camera. It is off at first; Enable turns it on.
- Aperture is the f-stop, from f/0.7 to f/22. A small number (f/1.4, f/2.8) gives a shallow, strongly blurred background; a large one (f/11, f/16) keeps more of the product sharp.
- Focus is the distance to the sharp plane. Double-click it to focus on the point the camera turns around.
- Pick focus point: click it, then click a spot on the model. That spot becomes sharp.
- Lock focus point keeps the spot that is sharp now in focus while you zoom or turn the camera; the Focus distance follows it.
- Blades is the number of aperture blades. It sets the shape of out-of-focus highlights (bokeh): round with 0, polygons with 5 to 9.
Distances are real: a model is 30 cm across, so f/2.8 at 85 mm gives the believable soft falloff of a macro product shot.
Framing
- Render frame is the shape of the picture: 16:9 landscape, 4:3, 1:1 square, 4:5 portrait, 9:16 vertical, or Fill window. The frame sits in the middle of the viewport, outlined by a thin line with an orange corner at each corner, and a small tag in its bottom left corner tells its shape and size in pixels, and the output size in the Render tab follows its shape.
- Crop guides draw where a crop of the picture would fall, for the shapes social media and websites use: 16:9, 1:1, 4:5, 9:16, or All at once. Each guide shows the pixel size you will get after cropping.
- Rule of thirds draws the lines that divide the picture in thirds, inside the crop guide when one is chosen.
- Darken outside shades what lies outside the guide.
Guides only show in the viewport: renders and PNGs always keep the full frame, so you can crop later. Press G to show or hide the guides (the rule of thirds). The crop guides are picked in the frame menu of the bar in the viewport.
The bar in the viewport
The small bar in the top-left corner of the viewport has:
- The padlock (Lock view): the camera stays put and the mouse wheel magnifies the picture instead, to check details up close. Drag to move around the magnified picture, double-click to go back to the whole frame. Ctrl + wheel does the same without locking. The render is not affected.
- The zoom (for example
82%): how big the render is shown compared with its own pixels; 100% is one render pixel per screen pixel. The arrow next to it goes back to the whole frame. - Guides shows or hides the rule of thirds.
- The frame shape (for example
4:5): opens a menu with the render frame and the crop guides.